[flutter] 비동기 병렬 처리(Future.wait) flutter 앱 적용기
![[flutter] 비동기 병렬 처리(Future.wait) flutter 앱 적용기](/content/images/size/w1200/2024/03/Craft_a-_soothing.webp)
들어가는 말
최근 진행했던 flutter 프로젝트에는 화면 당 초기에 2-3번 많게는 4-5번의 api 호출 을 하게 됩니다. 이처럼 여러 번의 api 호출 시 응답 속도를 개선한 경험이 있어 공유합니다.
이때 flutter의 비동기 처리 방식이 javascript와 유사한 부분이 많아 비교 참조 하였습니다.
javascript의 비동기 처리 방식
어플리케이션에서 네트워크 요청, 파일 읽기/쓰기 등과 같은 작업을 할 때 javascript에서는 비동기 방식으로 요청을 처리합니다.
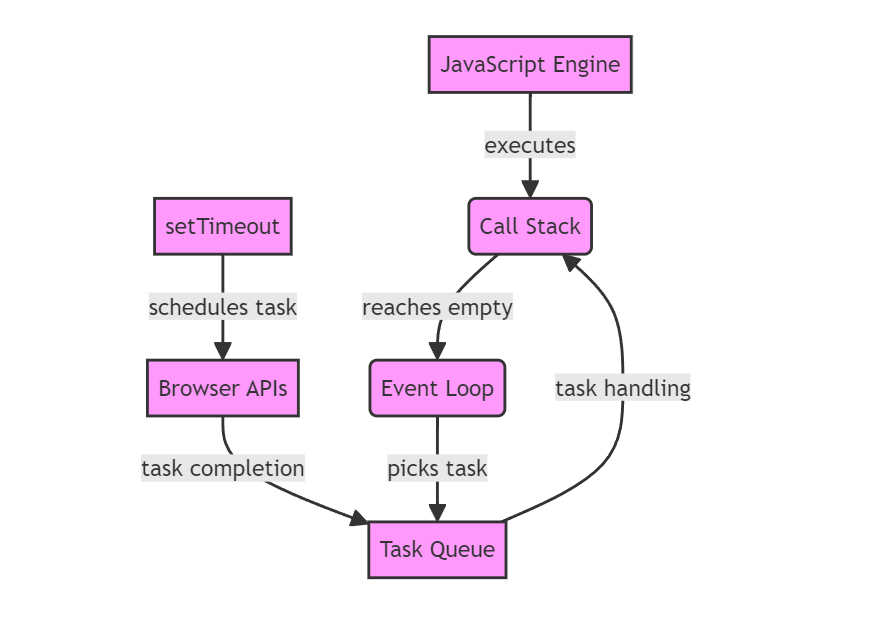
javascript는 단일 스레드(single-thread) 기반의 언어이기 때문에 한 번에 하나의 명령만 실행 할 수 있지만 네트워크 요청이나 파일 I/O 작업 등의 처리를 별도의 이벤트 루프(Event loop)에게 위임하면서 시간이 오래걸리는 작업을 어플리케이션 동작 정지 없이 효율적으로 처리 할 수 있습니다.
이때 javascript에서는 아래의 상태를 가지는 Promise 라는 객체를 사용합니다.
- 대기(Pending): 비동기 처리 로직이 아직 완료되지 않은 상태
- 이행(Fulfilled): 비동기 처리가 성공적으로 완료되어 프로미스가 결과값을 반환한 상태
- 거부(Rejected): 비동기 처리가 실패하거나 오류를 발생한 상태
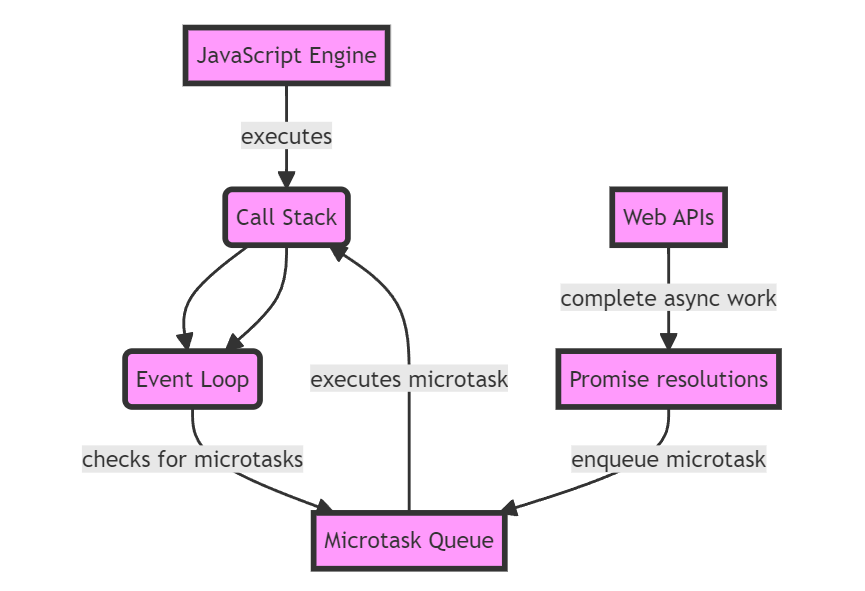
위 도식에서 Promise가 대기(Pending) 상태에서 이행(Fulfilled) 또는 거부(Reject) 상태가 되면 Microtask Queue에 쌓인 후 Event loop는 이를 확인하고 Call Stack 으로 이동시켜 실행합니다.
일반적으로 Microtask Queue는 Task Queue 보다 높은 우선순위를 가집니다.
| Task 종류 | 예시 | |
|---|---|---|
| Task | setTimeout | setInterval |
| Microtask | Promise callback | process.nextTick |
Call Stack에서 이행(Fulfilled) 또는 거부(Reject)된 Promise를 처리하는 방식은 크게 두 가지가 있습니다.
- 프로미스 체이닝
.then사용 async await사용
이 두 가지 방식을 이용하여 jsonplaceholder.typicode.com에서 제공하는 todo를 호출하는 예제 코드는 아래와 같습니다.
// 프로미스 체이닝 사용

fetch(`https://jsonplaceholder.typicode.com/todos/1`)
      .then(response => {
        if (!response.ok) {
          throw new Error(response.statusText);
        }
        return response.json();
      })
      .then(json => console.log(json))
      .catch(error => console.error(error));
// async await 사용
async function fetchTodo() {
try {
const response = await fetch(`https://jsonplaceholder.typicode.com/todos/1`);
if (!response.ok) {
throw new Error(response.statusText);
}
const json = await response.json();
console.log(json);
} catch (error) {
console.error(error);
}
}
fetchTodo();만약 여러 번의 api 호출을 한다면 async await 방식을 사용해서 아래와 같이 작성 할 수 있습니다.
const fetchAll = async () => {
const startTime = performance.now();
try {
const todoResponse = await fetch(`https://jsonplaceholder.typicode.com/todos/1`);
const todo = await todoResponse.json();
console.log('Todo', todo);
const postResponse = await fetch(`https://jsonplaceholder.typicode.com/posts/1`);
const post = await postResponse.json();
console.log('Post', post);
const commentResponse = await fetch(`https://jsonplaceholder.typicode.com/comments/1`);
const comment = await commentResponse.json();
console.log('Comment', comment);
} catch(error) {
console.error(error);
} finally {
const endTime = performance.now();
console.log(`Time taken: ${endTime - startTime} milliseconds`);
}
}
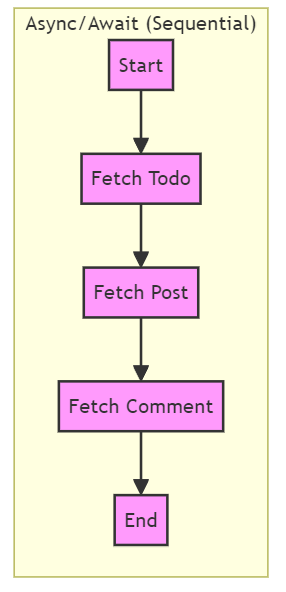
fetchAll();이러한 방식은 먼저 Todo API를 호출한 후 Promise가 resolved 되면 Post Api를 호출하는 순차적인 방식입니다.
이때 Timer로 Console에 출력된 값은 463 milliseconds 였습니다.
Promise.all( )
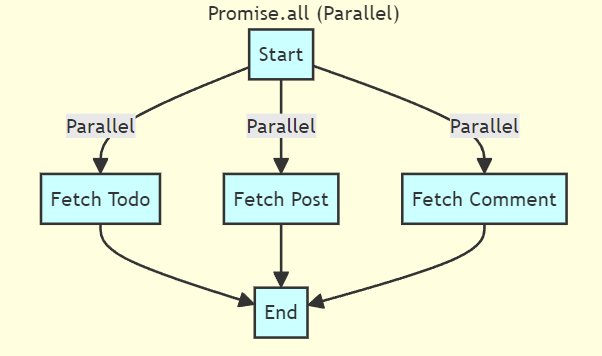
위에서 본 것 처럼 다수의 API 호출 등 여러 개의 Promise를 처리할 때는 Promise.all 메서드를 활용하여 여러 비동기 요청을 동시에 진행 할 수 있습니다.
const startTime = performance.now();

Promise.all([
  fetch(`https://jsonplaceholder.typicode.com/todos/1`),
  fetch(`https://jsonplaceholder.typicode.com/posts/1`),
  fetch(`https://jsonplaceholder.typicode.com/comments/1`),
]).then(response => Promise.all(response.map(res => res.json())))
  .then(([todo, post, comment]) => {
  console.log('Todo:', todo);
  console.log('Post:', post);
  console.log('Comment', comment);
  const endTime = performance.now();
  console.log(`Time taken: ${endTime - startTime} milliseconds`);
})
Promise.all() 메서드는 Promise 객체를 배열로 받은 후 API 호출 작업을 동시에 진행합니다. 이때 Timer로 Console에 출력된 값은 160 milliseconds 로 속도가 단축되었습니다.
만약 다수의 Promise 객체 중 하나라도 reject 상태가 된다면 나머지 Promise도 reject 처리 됩니다. 위 예제 코드에서 첫 번째 fetch 함수의 url을 틀리게 작성한 후 테스트 한 결과는 error 출력이었습니다.

flutter에서의 비동기 병렬처리
최근 진행한 flutter api 호출 속도 개선 역시 async await를 활용한 순차적인 api 호출에서 병렬처리 방식으로 바꾸는 방향으로 진행되었습니다.
flutter 개발에 쓰이는 dart 언어는 javascript 처럼 단일 스레드(single-thread) 기반의 언어이고 event loop를 사용합니다. javascript에 Promise에 대응 되는 개념은 dart에서는 Future 로 구현되었습니다.
또한 비동기 병렬처리를 위해 사용한 Promise.all() 메서드를 dart에서는 Future.wait() 메서드로 구현할 수 있습니다.
위에서 javascript로 비동기 병렬처리를 구현한 내용을 flutter로 구현해보면 아래와 같습니다.
async await를 사용한 순차적인 API 호출(752 milliseconds)
import 'dart:convert';
import 'package:http/http.dart' as http;

Future<void> fetchSequentially() async {
  final startTime = DateTime.now();

  try {
    final todoResponse = await http.get(Uri.parse('https://jsonplaceholder.typicode.com/todos/1'));
    final todo = jsonDecode(todoResponse.body);
    print('Todo: $todo');

    final postResponse = await http.get(Uri.parse('https://jsonplaceholder.typicode.com/posts/1'));
    final post = jsonDecode(postResponse.body);
    print('Post: $post');

    final commentResponse = await http.get(Uri.parse('https://jsonplaceholder.typicode.com/comments/1'));
    final comment = jsonDecode(commentResponse.body);
    print('Comment: $comment');
  } catch (error) {
    print('Error: $error');
  } finally {
    final endTime = DateTime.now();
    final timeTaken = endTime.difference(startTime);
    print('Time taken: ${timeTaken.inMilliseconds} milliseconds');
  }
}

void main() {
  fetchSequentially();
}Future.wait를 사용한 비동기 병렬처리(170 milliseconds)
import 'dart:convert';
import 'package:http/http.dart' as http;

void fetchAll() async {
  final startTime = DateTime.now();

  try {
    final responses = await Future.wait([
      http.get(Uri.parse('https://jsonplaceholder.typicode.com/todos/1')),
      http.get(Uri.parse('https://jsonplaceholder.typicode.com/posts/1')),
      http.get(Uri.parse('https://jsonplaceholder.typicode.com/comments/1')),
    ]);

    final todo = jsonDecode(responses[0].body);
    final post = jsonDecode(responses[1].body);
    final comment = jsonDecode(responses[2].body);

    print('Todo: $todo');
    print('Post: $post');
    print('Comment: $comment');
  } catch (error) {
    print('Error: $error');
  } finally {
    final endTime = DateTime.now();
    final timeTaken = endTime.difference(startTime);
    print('Time taken: ${timeTaken.inMilliseconds} milliseconds');
  }
}

void main() {
  fetchAll();
}